What is BGP?: The Border Gateway Protocol (BGP) is an inter-autonomous system routing protocol based on distance-vector algorithm. It is used to exchange routing information across the Internet and is the only protocol that is designed to deal with a network of the Internet's size and the only protocol that can deal well with having multiple connections to unrelated routing domains.
BGP is designed to allow for sophisticated administrative routing policies to be implemented. BGP does not exchange information about network topology but rather reachability information. As such, BGP is better suited to inter-AS environments and special cases like informational feeds. If you just need to enable dynamic routing in your network, consider OSPF instead.
For more information: Wiki Mikrotik | BGP or Wikipedia | BGP

Step 1: Connect your Mikrotik router with your pc with a utp cable. Collect winbox software (or download it from www.mikrotik.com).

Step 2: Add the primary link IP address with subnet mask and select the port.

Step 3: Add the secondary link IP address with subnet mask and select the port.

Step 4: Add the local block IP address with subnet mask and select the port.

Step 5: Add the public block IP address with subnet mask and select the port.

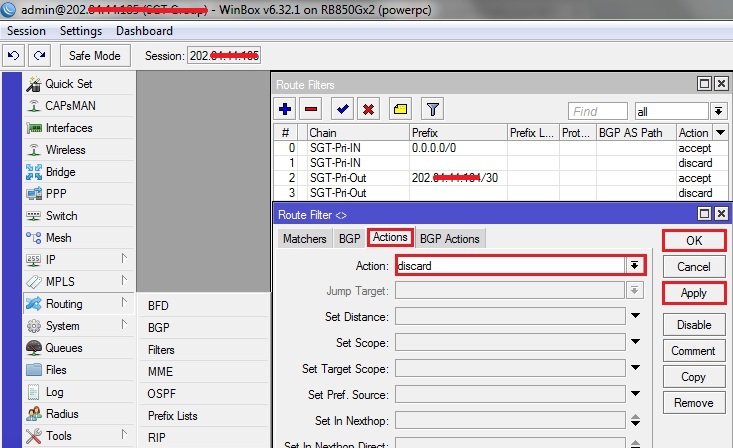
Step 6: Add the BGP filter rules for primary link and follow the below screenshot

Step 7: Add the BGP filter rules for primary link and follow the below screenshot

Step 8: Add the BGP filter rules for primary link and follow the below screenshot

Step 9: Add the BGP filter rules for primary link and follow the below screenshot

Step 10: Add the BGP filter rules for primary link and follow the below screenshot

Step 11: Add the BGP filter rules for primary link and follow the below screenshot

Step 12: Add the BGP filter rules for primary link and follow the below screenshot

Step 13: Add the BGP filter rules for primary link and follow the below screenshot

Step 14: Add the BGP filter rules for primary link and follow the below screenshot

Step 15: Add the BGP filter rules for secondary link and follow the below screenshot

Step 16: Add the BGP filter rules for secondary link and follow the below screenshot

Step 17: Add the BGP filter rules for secondary link and follow the below screenshot

Step 18: Add the BGP filter rules for secondary link and follow the below screenshot

Step 19: Add the BGP filter rules for secondary link and follow the below screenshot

Step 20: Add the BGP filter rules for secondary link and follow the below screenshot

Step 21: Add the BGP filter rules for secondary link and follow the below screenshot

Step 22: Add the BGP filter rules for secondary link and follow the below screenshot

Step 23: Add the BGP filter rules for secondary link and follow the below screenshot

Step 24: Add the BGP instance (AS and Router ID)

Steps 25: Add the public ip with network address.

Step 26: Add the BGP peers for primary link.

Step 27: Add the BGP peers for secondary link.

Step 27: Check the link state and uptime.

Step 28: Add NAT rule for private subnet.

Step 29: Add NAT rule for private subnet.

For more information: Wiki Mikrotik | BGP or Wikipedia | BGP


Step 4: Add the local block IP address with subnet mask and select the port.

Step 5: Add the public block IP address with subnet mask and select the port.

Step 6: Add the BGP filter rules for primary link and follow the below screenshot


Steps 25: Add the public ip with network address.

Step 26: Add the BGP peers for primary link.


Thanks You