The MikroTik HotSpot Gateway provides authentication for clients before access to public networks .
HotSpot Gateway features:
• Different authentication methods of clients using local client database on the router, or remote RADIUS server;
• Users accounting in local database on the router, or on remote RADIUS server;
• Walled-garden system, access to some web pages without authorization;
• Login page modification, where you can put information about the company;
• Automatic and transparent change any IP address of a client to a valid address;
UP Link IP Address: 10.10.10.2/30
Local IP Address: 192.168.0.1/24
Platform: Mikrotik Router
Step 1: Connect your Mikrotik router with your pc with a utp cable. Collect winbox software (or download it from www.mikrotik.com), click on refresh tab for MAC scan, select the mac which has shown, login with admin user, no password.

Step 2: Add wan side IP address, subnet mask and select port.

Step 3: Then add LAN Side IP address, subnet mask and select port.

Step 4: Add routes.

Step 5: Add DNS address.

Step 6: Add NAT rules.

Step 7: Add NAT rules.

Step 8: Add NAT rules.

Step 9: DHCP Server configuration.

Step 10: DHCP Server configuration.

Step 11: DHCP Server configuration.

Step 12: DHCP Server configuration

Step 13: DHCP Server configuration.

Step 14: DHCP Server configuration.

Step 15: Let's start to configure hotspot solution.

Step 16: Hotspot server profiles configuration.

Step 17: Hotspot user profiles configuration with bandwidth limit.

Step 18: Hotspot users configuration.

Step 19: Hotspot customized login page.

Step 20: Put user name & password for login.

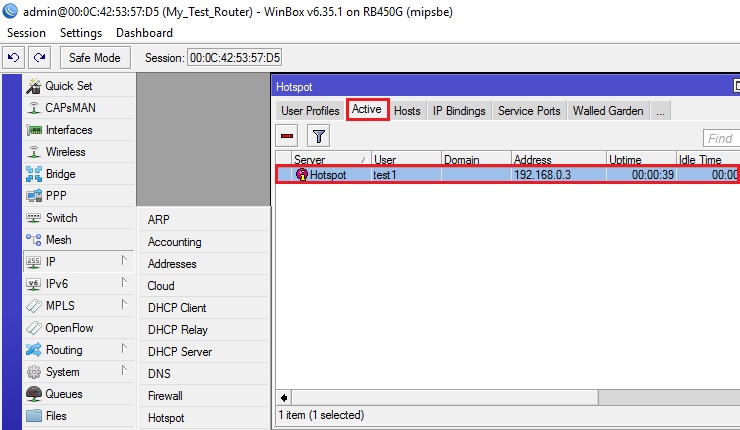
Step 21: Successfully login hotspot user and showing ip address, mac address, time etc.

Step 22: Successfully login hotspot user login. It's checking from mikrotik router.
Explanation: First we give a code snippet and then explain what it actually does.
/ip address
add address=192.168.0.1/24 comment=Local interface=ether3 network=192.168.0.0
add address=10.10.10.2/30 comment=UP_Link interface=ether1 network=10.10.10.0
/ip route
add check-gateway=ping distance=1 gateway=10.10.10.1
/ip dns
set servers=8.8.8.8, 4.2.2.2
/ip firewall nat
add action=masquerade chain=srcnat src-address=192.168.0.0/24
DHCP server configuration:
/ip dhcp-server
add address-pool=dhcp_pool1 disabled=no interface=ether3 lease-time=1d name=\
dhcp1 relay=8.8.8.8
/ip dhcp-server network
add address=192.168.0.0/24 gateway=192.168.0.1
Hotspot profile create:
/ip hotspot profile
add hotspot-address=192.168.0.1 html-directory=bray/bray/bray login-by=\
cookie,http-chap,https name=hsprof
Hotspot pool:
/ip hotspot
add address-pool=dhcp_pool1 disabled=no idle-timeout=none interface=ether3 \
name=Hotspot profile=hsprof
Hotspot user profile and bandwidth limite:
/ip hotspot user profile
add address-pool=dhcp_pool1 name=512k/512k rate-limit=512k/512k \
transparent-proxy=yes
add address-pool=dhcp_pool1 name=1000k/1000k rate-limit=1000k/1000k \
transparent-proxy=yes
add address-pool=dhcp_pool1 name=2000k/2000k rate-limit=2000k/2000k \
transparent-proxy=yes
add address-pool=dhcp_pool1 name=3000k/3000k rate-limit=3000k/3000k \
transparent-proxy=yes
Hotspot user create:
/ip hotspot user
add name=test1 password=1 profile=3000k/3000k server=Hotspot
Hotspot Customized Login Page: Customized Page
Thank You
HotSpot Gateway features:
• Different authentication methods of clients using local client database on the router, or remote RADIUS server;
• Users accounting in local database on the router, or on remote RADIUS server;
• Walled-garden system, access to some web pages without authorization;
• Login page modification, where you can put information about the company;
• Automatic and transparent change any IP address of a client to a valid address;
UP Link IP Address: 10.10.10.2/30
Local IP Address: 192.168.0.1/24
Platform: Mikrotik Router
Step 1: Connect your Mikrotik router with your pc with a utp cable. Collect winbox software (or download it from www.mikrotik.com), click on refresh tab for MAC scan, select the mac which has shown, login with admin user, no password.
Step 2: Add wan side IP address, subnet mask and select port.
Step 3: Then add LAN Side IP address, subnet mask and select port.
Step 4: Add routes.
Step 5: Add DNS address.
Step 6: Add NAT rules.
Step 7: Add NAT rules.
Step 8: Add NAT rules.
Step 9: DHCP Server configuration.
Step 10: DHCP Server configuration.
Step 11: DHCP Server configuration.
Step 12: DHCP Server configuration
Step 13: DHCP Server configuration.
Step 14: DHCP Server configuration.
Step 15: Let's start to configure hotspot solution.
Step 16: Hotspot server profiles configuration.
Step 17: Hotspot user profiles configuration with bandwidth limit.
Step 18: Hotspot users configuration.
Step 19: Hotspot customized login page.

Step 20: Put user name & password for login.

Step 21: Successfully login hotspot user and showing ip address, mac address, time etc.

Step 22: Successfully login hotspot user login. It's checking from mikrotik router.
Explanation: First we give a code snippet and then explain what it actually does.
/ip address
add address=192.168.0.1/24 comment=Local interface=ether3 network=192.168.0.0
add address=10.10.10.2/30 comment=UP_Link interface=ether1 network=10.10.10.0
/ip route
add check-gateway=ping distance=1 gateway=10.10.10.1
/ip dns
set servers=8.8.8.8, 4.2.2.2
/ip firewall nat
add action=masquerade chain=srcnat src-address=192.168.0.0/24
DHCP server configuration:
/ip dhcp-server
add address-pool=dhcp_pool1 disabled=no interface=ether3 lease-time=1d name=\
dhcp1 relay=8.8.8.8
/ip dhcp-server network
add address=192.168.0.0/24 gateway=192.168.0.1
Hotspot profile create:
/ip hotspot profile
add hotspot-address=192.168.0.1 html-directory=bray/bray/bray login-by=\
cookie,http-chap,https name=hsprof
Hotspot pool:
/ip hotspot
add address-pool=dhcp_pool1 disabled=no idle-timeout=none interface=ether3 \
name=Hotspot profile=hsprof
Hotspot user profile and bandwidth limite:
/ip hotspot user profile
add address-pool=dhcp_pool1 name=512k/512k rate-limit=512k/512k \
transparent-proxy=yes
add address-pool=dhcp_pool1 name=1000k/1000k rate-limit=1000k/1000k \
transparent-proxy=yes
add address-pool=dhcp_pool1 name=2000k/2000k rate-limit=2000k/2000k \
transparent-proxy=yes
add address-pool=dhcp_pool1 name=3000k/3000k rate-limit=3000k/3000k \
transparent-proxy=yes
Hotspot user create:
/ip hotspot user
add name=test1 password=1 profile=3000k/3000k server=Hotspot
Hotspot Customized Login Page: Customized Page
Thank You